本記事はアフィリエイトリンクを含んでいます。
本記事について
本記事では、Fortinet 社のファイアウォール製品である FortiGate に関して、以下のような初期設定を CLI で実施する方法について説明します。
- 初回ログインとパスワード設定
- CLI ログ表示設定
- グローバル設定基本項目
- ホスト名設定
- タイムゾーン設定
- GUI 言語設定
- 管理者タイムアウト時間設定
- デフォルトで存在する不要な設定の削除
- インターフェース基本設定
- IP アドレスの手動設定
- 管理アクセス許可設定
- スタティックルート設定
動作確認環境
本記事の内容は以下の機器にて動作確認を行った結果に基づいて作成されています。
- FortiGate-60F
- バージョン 7.4.3
ターミナルソフト Tera Term の準備
CLI で FortiGate の設定を行うためにはターミナルソフトである Tera Term を操作端末にインストールしておく必要があります。
Tera Term 公式サイトや窓の社からインストーラをダウンロードして操作端末にインストールしてください。
FortiGate へのコンソール接続と電源投入
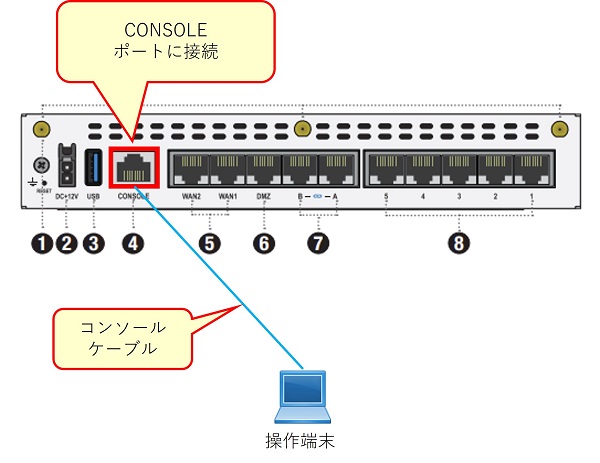
FortiGate への電源投入を行いますが、その前に操作端末を FortiGate のコンソールポートに接続し、FortiGate の起動ログを確認できる状態にします。
コンソールケーブルを使用して操作端末を FortiGate のコンソールポートに接続します。
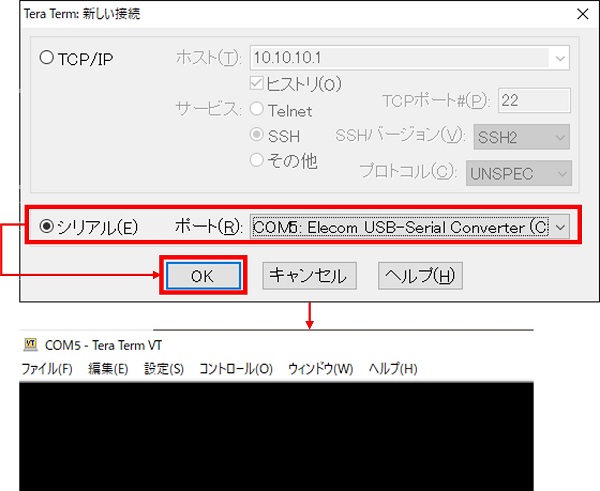
操作端末にて Tera Term を起動して、「シリアル」を選択してコンソールケーブルに対応するポートを選択し「OK」をクリックします。
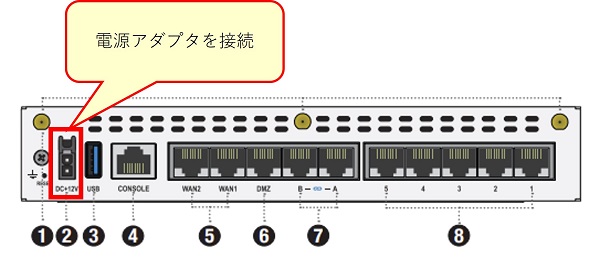
Tera Term の準備ができたら FortiGate への電源投入を行います。FortiGate に電源アダプタのケーブルを接続し、電源ケーブルを電源コンセントに接続します。
その後操作端末の Tera Term 画面を確認すると、以下のようなログが表示されます。
FortiGate-60F (04:45-05.31.2023)
Ver:05000100
Serial number: FGT60FTKxxxxxxxx
CPU: 1200MHz
Total RAM: 2 GB
Initializing boot device...
Initializing MAC... NP6XLITE#0
Please wait for OS to boot, or press any key to display configuration menu......

Booting OS...
Initializing firewall...

System is starting...


FortiGate-60F login:
初回ログインとパスワード設定
以下の表示がされたらログインができる状態になっています。
FortiGate-60F login:初回ログイン用のユーザ情報は以下の通りです。
- ユーザ: admin
- パスワード: 設定無し (何も入力しない)
また初回ログイン後にパスワードの設定が必要です。
以下は初回ログイン時のログです。
FortiGate-60F login: admin "←admin と入力し Enter を押下する"
Password:                  "←何も入力せずに Enter を押下する"
You are forced to change your password. Please input a new password.
New Password:              "←設定するパスワードを入力し Enter を押下する"
Confirm Password:          "←設定するパスワードを再度入力し Enter を押下する"
Welcome!

FortiGate-60F #            "←ログイン後は「ホスト名 #」のプロンプトになります"
CLI ログ表示設定
FortiGate のデフォルト設定では、CLI でログを表示したときに 1 ページ分のログを表示すると表示が止まり、続きを表示するためには Enter またはスペースキーを押下する必要があります。
必要に応じてすべてのログをまとめて表示させるための設定を行います。
設定対象のコンフィグ項目は以下のoutputです。
config system console
    set output more
endoutputの設定値はデフォルトではmoreになっています。これをstandardに変更することでログをまとめて表示するようにできます。
config system console
    set output standard
end
上の 3 行をそのまま CLI で入力すると設定変更ができます。以下は設定ログです。
FortiGate-60F # config system console

FortiGate-60F (console) #     set output standard

FortiGate-60F (console) # end

FortiGate-60F #
グローバル設定基本項目
ホスト名設定
FortiGate のホスト名を設定します。FortiGate-60F バージョン 7.4.3 の場合、デフォルトのホスト名は「FortiGate-60F」になっています。これを変更します。
ホスト名の設定は以下のコンフィグで設定されています。
config system global
    set hostname "FortiGate-60F"
end例えばホスト名を「FortiGate-60F-01」に変更したい場合は以下のコマンドを実行します。
config system global
    set hostname "FortiGate-60F-01"
end
以下は設定ログです。
FortiGate-60F # config system global

FortiGate-60F (global) #     set hostname "FortiGate-60F-01"

FortiGate-60F (global) # end

FortiGate-60F-01 #
ホスト名を変更するとプロンプト部分の表示が新しいホスト名に変わります。
タイムゾーン設定
FortiGate のデフォルトのタイムゾーンは「US/Pacific」になっています。これを日本時間に設定変更します。
ホスト名の設定は以下のコンフィグで設定されています。
config system global
    set timezone "US/Pacific"
end
タイムゾーンを日本時間に変更したい場合は以下のコマンドを実行します。
config system global
    set timezone "Asia/Tokyo"
end以下は設定ログです。
FortiGate-60F-01 # config system global

FortiGate-60F-01 (global) #     set timezone "Asia/Tokyo"

FortiGate-60F-01 (global) # end

FortiGate-60F-01 #
GUI 表示言語設定
デフォルトの設定では GUI の表示言語は英語になっています。これを日本時間に設定変更します。
GUI 表示言語の設定は以下のコンフィグで設定されています。
config system global
    set language english
end
GUI 表示言語を日本語に変更したい場合は以下のコマンドを実行します。
config system global
    set language japanese
end
以下は設定ログです。
FortiGate-60F-01 # config system global

FortiGate-60F-01 (global) #     set language japanese

FortiGate-60F-01 (global) # end

FortiGate-60F-01 #
管理者タイムアウト時間設定
FortiGate の GUI や CLI にログインしている場合に一定時間操作が行われないと自動でログアウトされます。ログアウトするまでの時間が管理者タイムアウト時間です。デフォルトでは 5 分となっています。必要に応じてこの時間を変更します。
管理者タイムアウト時間の設定は以下のコンフィグで設定されています。
config system global
    set admintimeout 5
end
例えば管理者タイムアウト時間を 60 分に変更したい場合は以下のコマンドを実行します。
config system global
    set admintimeout 60
end
以下は設定ログです。
FortiGate-60F-01 # config system global

FortiGate-60F-01 (global) #     set admintimeout 60

FortiGate-60F-01 (global) # end

FortiGate-60F-01 #
デフォルトで存在する不要な設定の削除
FortiGate では工場出荷状態のコンフィグであってもインターフェースの設定やファイアウォールポリシーの設定などが存在します。これらのデフォルト設定は導入環境に合わせて FortiGate を設定する上では不要な設定になるため、デフォルトの設定を削除します。
FortiGate-60F バージョン 7.4.3 ではデフォルトで internal VLAN スイッチと fortilink アグリゲートインターフェースが存在しますが、これらを削除することが最終目的となります。
DHCP サーバ機能の削除
デフォルトで存在する internal VLAN スイッチと fortilink アグリゲートインターフェースにて DHCP 設定があるためこれを削除します。
CLI にて以下コマンドを実行します。
config system dhcp server
purge
y
end
以下は設定ログです。
FortiGate-60F-01 # config system dhcp server

FortiGate-60F-01 (server) # purge
This operation will clear all table!
Do you want to continue? (y/n)y


FortiGate-60F-01 (server) #

FortiGate-60F-01 (server) # end

FortiGate-60F-01 #
NTP サーバ機能の削除
デフォルトで fortilink アグリゲートインターフェースにて NTP サーバ機能が有効になっているためこれを削除します。
CLI にて以下コマンドを実行します。
config system ntp
    set server-mode disable
end
以下は設定ログです。
FortiGate-60F-01 # config system ntp

FortiGate-60F-01 (ntp) #     set server-mode disable

FortiGate-60F-01 (ntp) # end

FortiGate-60F-01 #
ファイアウォールポリシーの削除
デフォルトで internal から wan1 への通信を許可するファイアウォールポリシーが設定されているためこれを削除します。
CLI にて以下コマンドを実行します。
config firewall policy
    delete 1
end
以下は設定ログです。
FortiGate-60F-01 # config firewall policy

FortiGate-60F-01 (policy) #     delete 1

FortiGate-60F-01 (policy) # end

FortiGate-60F-01 #
アドレスオブジェクトの削除
デフォルトで internal に対応するアドレスオブジェクトが設定されているためこれを削除します。
CLI にて以下コマンドを実行します。
config firewall address
    delete internal
end
以下は設定ログです。
FortiGate-60F-01 # config firewall address

FortiGate-60F-01 (address) #     delete internal

FortiGate-60F-01 (address) # end

FortiGate-60F-01 #
internal と fortilink の削除
internal VLAN スイッチと fortilink アグリゲートインターフェースを削除します。
まず以下コマンドで fortilink を削除します。
config system interface
    delete fortilink
end
次に以下コマンドで internal を削除します。
config system virtual-switch
    delete internal
end
以下は設定ログです。
FortiGate-60F-01 # config system interface

FortiGate-60F-01 (interface) #     delete fortilink

FortiGate-60F-01 (interface) # end

FortiGate-60F-01 #
FortiGate-60F-01 # config system virtual-switch

FortiGate-60F-01 (virtual-switch) #     delete internal

FortiGate-60F-01 (virtual-switch) # end

FortiGate-60F-01 #
以上で不要な設定の削除は完了です。
インターフェース基本設定
ここでは以下のような構成を想定してインターフェースの設定を行うこととします。
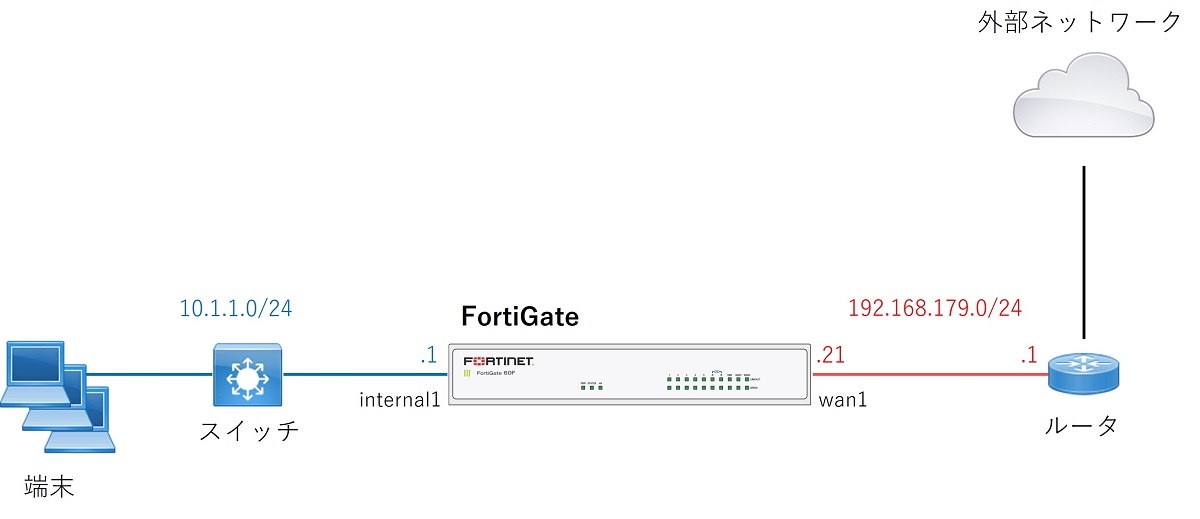
- wan1
- 外部ネットワークに接続するインターフェース
- IPアドレス: 192.168.179.21/24
- internal1
- 内部ネットワークに接続するインターフェース
- IPアドレス: 10.1.1.1/24
IP アドレスの手動設定
インターフェースの IP アドレスの手動設定を行うためには、まず対象インターフェースのアドレッシングモードを静的 (static) に設定し、その後 IP アドレスを設定します。
設定コマンドは以下の通りです。"internal1"の部分は設定対象インターフェース名にしてください。
config system interface
    edit "internal1"
        set mode static
        set ip 10.1.1.1 255.255.255.0
    next
end
以下は設定ログです。
FortiGate-60F-01 # config system interface

FortiGate-60F-01 (interface) #     edit "internal1"

FortiGate-60F-01 (internal1) #         set mode static

FortiGate-60F-01 (internal1) #         set ip 10.1.1.1 255.255.255.0

FortiGate-60F-01 (internal1) #     next

FortiGate-60F-01 (interface) # end

FortiGate-60F-01 #
同様に wan1 のアドレスも以下コマンドで設定します。
config system interface
    edit "wan1"
        set mode static
        set ip 192.168.179.21 255.255.255.0
    next
end
以下は設定ログです。
FortiGate-60F-01 # config system interface

FortiGate-60F-01 (interface) #     edit "wan1"

FortiGate-60F-01 (wan1) #         set mode static

FortiGate-60F-01 (wan1) #         set ip 192.168.179.21 255.255.255.0

FortiGate-60F-01 (wan1) #     next

FortiGate-60F-01 (interface) # end

FortiGate-60F-01 #
管理アクセス許可設定
管理アクセス許可設定は、対象インターフェースのアドレス宛の https, ssh, telnet, ping, snmp 等の管理アクセスを許可するための設定です。
ここでは例として internl1 に対して ping, https, ssh を許可する設定をします。設定コマンドは以下の通りです。
config system interface
    edit "internal1"
        set allowaccess ping https ssh
    next
end
以下は設定ログです。
FortiGate-60F-01 # config system interface

FortiGate-60F-01 (interface) #     edit "internal1"

FortiGate-60F-01 (internal1) #         set allowaccess ping https ssh

FortiGate-60F-01 (internal1) #     next

FortiGate-60F-01 (interface) # end

FortiGate-60F-01 #
スタティックルート設定
スタティックルートは FortiGate が直接接続していないネットワークセグメント宛にルーティングするための設定です。
ここでは以下構成にて外部ネットワークと通信するためにルータをネクストホップとするデフォルトルートを FortiGate に設定する場合を例として説明します。
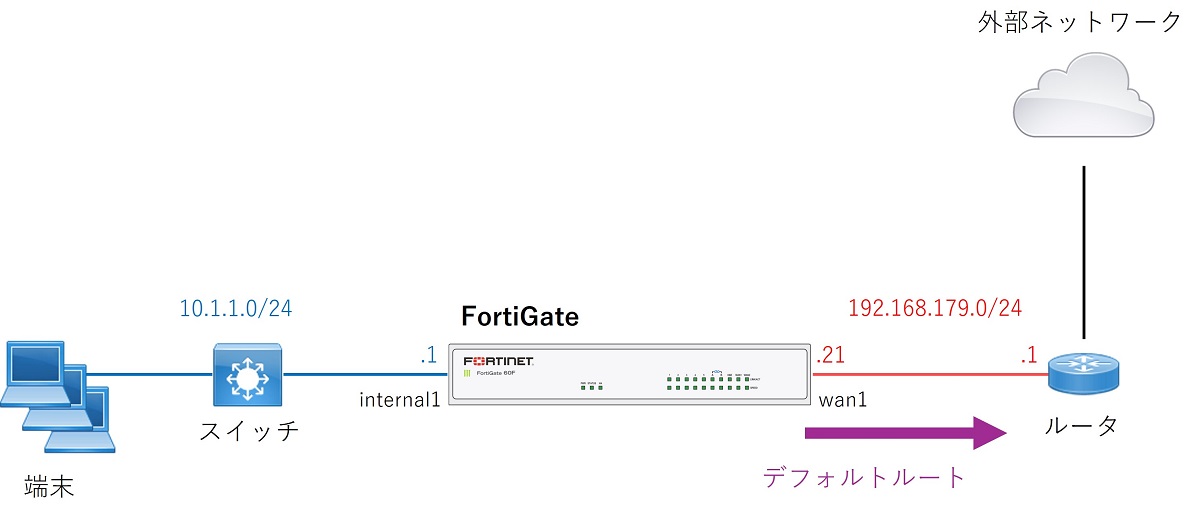
まずshow router staticを実行しスタティックルートが何も設定されていないことを確認します。
FortiGate-60F-01 # show router static
config router static
end
確認できたら以下コマンドでスタティックルートを設定します。
config router static
    edit 1
        set dst 0.0.0.0 0.0.0.0
        set gateway 192.168.179.1
        set device "wan1"
    next
end| 設定項目 | 意味 | 備考 |
|---|---|---|
| dst | 宛先ネットワーク | デフォルトルートの場合は 0.0.0.0 0.0.0.0 とする |
| gateway | ネクストホップ | 今回の例ではルータのアドレス |
| device | 出力インターフェース | 今回の例では wan1 から出力 |
以下は設定ログです。
FortiGate-60F-01 # config router static

FortiGate-60F-01 (static) #     edit 1
new entry '1' added

FortiGate-60F-01 (1) #         set dst 0.0.0.0 0.0.0.0

FortiGate-60F-01 (1) #         set gateway 192.168.179.1

FortiGate-60F-01 (1) #         set device "wan1"

FortiGate-60F-01 (1) #     next
The destination is set to 0.0.0.0/0 which means all IP addresses.

FortiGate-60F-01 (static) # end

FortiGate-60F-01 #
ここまでの設定の確認
本記事で説明する初期設定は以上です。FortiGate のコンフィグを確認し、設定が想定通りであることを確認してください。
CLI ログ表示設定
show system consoleコマンドでコンフィグを確認します。
FortiGate-60F-01 # show system console
config system console
    set output standard
end
グローバル設定
show system globalコマンドを実行し、ホスト名、タイムゾーン設定、GUI 表示言語設定、管理者タイムアウト時間設定を確認します。
FortiGate-60F-01 # show system global
config system global
    set admintimeout 60
    set alias "FortiGate-60F"
    set gui-auto-upgrade-setup-warning disable
    set hostname "FortiGate-60F-01"
    set language japanese
    set switch-controller enable
    set timezone "Asia/Tokyo"
    set virtual-switch-vlan enable
end
※設定していない項目も表示されますが、それらは無視してください
インターフェース設定
show system interfaceコマンドを実行しコンフィグを確認します。
FortiGate-60F-01 # show system interface
config system interface
    edit "wan1"
        set vdom "root"
        set ip 192.168.179.21 255.255.255.0
        set allowaccess ping fgfm
        set type physical
        set role wan
        set snmp-index 1
    next
#中略
    edit "internal1"
        set vdom "root"
        set ip 10.1.1.1 255.255.255.0
        set allowaccess ping https ssh
        set type physical
        set snmp-index 4
    next
#後略
end
※すべてのインターフェースについて表示されますが、設定対象インターフェースについて確認してください
スタティックルート設定
show router staticコマンドを実行しコンフィグを確認します。
FortiGate-60F-01 # show router static
config router static
    edit 1
        set gateway 192.168.179.1
        set device "wan1"
    next
end
※dst については 0.0.0.0 0.0.0.0 と設定している場合デフォルト値扱いとなり表示されません
またget router info routing-table allコマンドでルーティングテーブルの内容を確認できます。
FortiGate-60F-01 # get router info routing-table all
Codes: K - kernel, C - connected, S - static, R - RIP, B - BGP
       O - OSPF, IA - OSPF inter area
       N1 - OSPF NSSA external type 1, N2 - OSPF NSSA external type 2
       E1 - OSPF external type 1, E2 - OSPF external type 2
       i - IS-IS, L1 - IS-IS level-1, L2 - IS-IS level-2, ia - IS-IS inter area
       V - BGP VPNv4
       * - candidate default

Routing table for VRF=0
S*      0.0.0.0/0 [10/0] via 192.168.179.1, wan1, [1/0]
C       10.1.1.0/24 is directly connected, internal1
C       10.10.10.0/24 is directly connected, dmz
C       192.168.179.0/24 is directly connected, wan1
その他の設定へ
この後は要件に合わせてファイアウォールポリシー等の設定を行います。
各種機能の設定方法は以下のおすすめ記事にまとめているためご確認ください。
【おすすめ】FortiGate の設計構築中なら以下の記事も役立つかもです
- 基礎知識
- HA (冗長構成) 設定
- FortiGate HA モードの Active-Passive と Active-Active の違いを解説します
- FortiGate HA(冗長構成)の概要と設定ガイド【詳しく解説】※note記事
- FortiGate HA 構成時のコンフィグ同期の仕様について解説します
- FortiGate HA 構成時の NTP,Syslog,SNMP 等の送信元インターフェースを解説 [ha-direct 設定]
- FortiGate HA 構成時の仮想 MAC アドレスについて解説します
- FortiGate HA ハートビート送信間隔と障害判定しきい値の設定ガイド
- FortiGate HA 構成時のバックアップ及びリストア実施ガイド
- FortiGate HA 構成でのモニタインターフェースダウン時の通信断時間について解説
- FortiGate HA 構成に関するQ&A 【良くありそうな疑問集】
- VDOM (バーチャルドメイン) 設定
- トランスペアレントモード設定
- システム系設定
- 管理者アカウント設定
- 時刻・NTP 設定
- ロギング・Syslog 送信設定
- SNMP 設定
- DHCP サーバ機能設定
- Proxy サーバ機能設定
- アラートメール送信
- ネットワーク系設定
- インターフェース設定
- ルーティング設定
- DNS 設定
- NAT 及び NAPT 設定
- ファイアウォール系設定
- アドレス設定
- サービス設定
- ファイアウォールポリシー設定
- ゾーンを使用したポリシー設定
- VPN 系設定
- Tips
Amazon アフィリエイトリンク
以下は Amazon アフィリエイトリンクです。インフラエンジニアにそこそこおすすめなアイテムです。
note メンバーシップへの参加もお待ちしています!

【アフィリエイト】おすすめ WordPress テーマ【SWELL】
当サイトでは WordPress テーマとして SWELL を使用しています。以前は無料・高機能テーマとして知られる Cocoon を使用していて Cocoon も使いやすかったのですが、SWELL を使い始めてからは SWELL のほうが圧倒的に使いやすいなと思いました。そして何より読み込み速度が速い。SWELL を使い始めてから、過去の Cocoon のブログを見直したときに「あれ、こんなに表示遅かったっけ?」という感覚になりました。
また SWELL はデフォルトでもオシャレなデザインですが柔軟にカスタマイズすることもでき個性のあるサイトを作成できます。さらにブログパーツや広告タグといった再利用可能なブログの「部品」も作成することができ、ブログ作成効率も高いです。
技術ブログやアフィリエイト等での収益化を見据えたブログの作成に SWELL は最適です。初見では価格が高いなと思うと思いますが、私としては SWELL を採用して良かったしそれ以上の価値があると感じています。
ブログの新設やテーマ変更を考えている人は一度 SWELL を検討してみてください。
以下の画像リンクから詳細な情報を確認できます。
レンタルサーバーを探している人には安定性に定評のあるエックスサーバーをお勧めします。
当サイトもエックスサーバーを使用しています。WordPress のインストールも簡単にできます。


コメント