検証環境
- CentOS Stream 9
- Postfix 3.5.9-24
- Dovecot 2.3.16-11
- cyrus-sasl 2.1.27-21
想定シナリオ
ネットワーク内にはメール送受信サーバとメールクライアントが存在します。CentOS Stream 9 のサーバには送信サーバとして Postfix、受信サーバとして Dovecot をインストールし、クライアントの Thunderbird からメール送受信ができるように設定します。
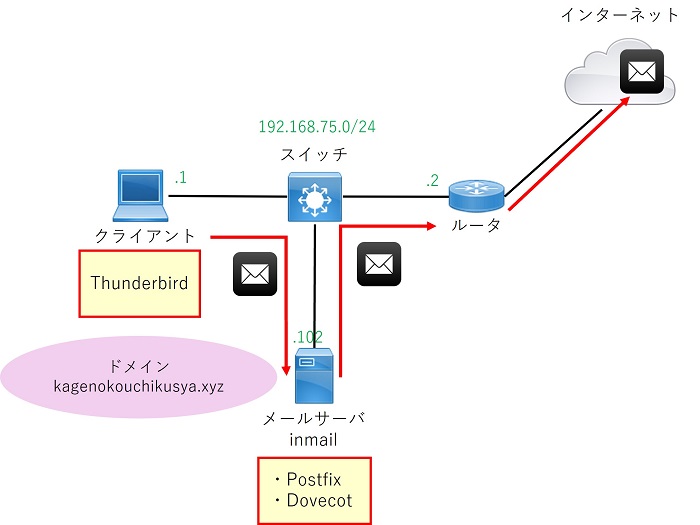
なお、メールサーバでは SASL を使用して Postfix に認証機能を追加することとします。
実際にインターネット上のメールサーバにメール送信したり、インターネット上からメールを受信するためにはルータでの NAT の設定、ドメインの取得及び DNS レコードの追加が必要です。ドメイン取得については以下の記事で説明しています。

SELinux の無効化
/etc/selinux/config にてSELINUX=enforcingをSELINUX=disabledに変更します。
#SELINUX=enforcing
SELINUX=disabled
設定変更後は再起動させます。
reboot再起動後 SELinux が無効になっていることを確認します。
[root@inmail ~]# getenforce
Disabled
メール送信サーバ Postfix の設定
必要パッケージインストール
dnf install -y postfix cyrus-sasl cyrus-sasl-plain/etc/postfix/main.cf の設定
オリジナルファイルのバックアップ。
cd /etc/postfix
cp -p main.cf main.cf_org
設定内容は以下の通り。
#既存設定またはコメントアウトからの変更
myhostname = inmail.kagenokouchikusya.xyz
mydomain = kagenokouchikusya.xyz
myorigin = $mydomain
inet_interfaces = all
inet_protocols = ipv4
mydestination = $myhostname, localhost.$mydomain, localhost, $mydomain
mynetworks = 127.0.0.0/8,192.168.75.0/24
mail_spool_directory = /var/mail/
smtpd_banner = $myhostname ESMTP

#ファイル末尾に追加
smtpd_sasl_auth_enable = yes
smtpd_sasl_security_options = noanonymous
broken_sasl_auth_clients = yes
smtpd_recipient_restrictions = permit_mynetworks,
    permit_sasl_authenticated,
    reject_unauth_destination
disable_vrfy_command = yes| 設定項目 | 項目の説明 | 設定値 | 設定値の説明 |
|---|---|---|---|
| myhostname | Postfix サーバの FQDN | ー | ホスト名+ドメインで指定 |
| mydomain | Postfix サーバの所属ドメイン | ー | ドメインを指定 |
| myorigin | メールアドレスの@より後ろの文字列 | ー | 通常mydomainと同じにする |
| inet_interfaces | Postfix がリッスンするインターフェース | all | すべてのインターフェース |
| アドレス指定 | 指定したアドレスを持つ インターフェース | ||
| inet_protocols | Postfix が対応するプロトコル | all | IPv4とIPv6の両方 |
| ipv4 | IPv4のみ | ||
| ipv6 | IPv6のみ | ||
| mydestination | 他のサーバにリレーせずに自身のローカルに配送する宛先 | ー | ー |
| mynetworks | メールリレーを許可する送信元ネットワーク範囲 | アドレス/マスク長 | CIDR形式で指定 |
| home_mailbox | メール格納先をユーザのホームディレクトリ配下にする場合に格納先ファイル名orディレクトリ名を指定。末尾に「/」があればディレクトリ、無ければファイルの扱い。下のmail_spool_directoryより優先される。 | ファイル名 | mbox形式 |
| ディレクトリ名/ | Maildir形式 | ||
| mail_spool_directory | メールを任意のディレクトリに保存したい場合にその保存先と形式を指定。末尾に「/」があればディレクトリ、無ければファイルの扱い。home_mailboxが設定されている場合この設定は無視される。 | ファイル名 | mbox形式 |
| ディレクトリ名/ | Maildir形式 | ||
| smtpd_banner | Telnet等でアクセスした際のバナー表示内容の設定 | 文字列 | 表示文字列を指定 |
| smtpd_sasl_auth_enable | SASL 認証の有効化 | yes/no | ー |
| smtpd_sasl_security_options | SASL 認証メカニズム | noanonymous | 匿名ログインを非許可 |
| noplaintext | 平文パスワードを非許可 | ||
| noactive | non-dictionary active 攻撃に脆弱な認証方法を非許可 | ||
| nodictionary | passive dictionary 攻撃に脆弱な認証方法を非許可 | ||
| mutual_auth | 相互認証を提供する方法のみを許可 | ||
| broken_sasl_auth_clients | 古いバージョンの AUTH コマンド (RFC 2554) を実装したクライアントとの相互運用性を有効化 | yes/no | ー |
| smtpd_recipient_restrictions | RCPT TO コマンド実行時に適用するアクセス制限 | permit_mynetworks | 送信元がmynetworksに合致する場合許可 |
| permit_sasl_authenticated | SASL認証に成功している場合許可 | ||
| reject_unauth_destination | 宛先が条件に合致しない場合拒否 | ||
| disable_vrfy_command | SMTP VRFY コマンドを無効化 | yes/no | ー |
/etc/postfix/master.cf の設定
オリジナルファイルのバックアップ。
cd /etc/postfix
cp -p master.cf master.cf_org
設定内容は以下の通り。
#以下行のコメントアウトの解除
submission inet n       -       n       -       -       smtpd
  -o smtpd_sasl_auth_enable=yes
  -o smtpd_relay_restrictions=permit_sasl_authenticated,reject
設定後コンフィグは以下の通り。
#前略
# ==========================================================================
# service type  private unpriv  chroot  wakeup  maxproc command + args
#               (yes)   (yes)   (no)    (never) (100)
# ==========================================================================
smtp      inet  n       -       n       -       -       smtpd
#smtp      inet  n       -       n       -       1       postscreen
#smtpd     pass  -       -       n       -       -       smtpd
#dnsblog   unix  -       -       n       -       0       dnsblog
#tlsproxy  unix  -       -       n       -       0       tlsproxy
submission inet n       -       n       -       -       smtpd
#  -o syslog_name=postfix/submission
#  -o smtpd_tls_security_level=encrypt
  -o smtpd_sasl_auth_enable=yes
#  -o smtpd_tls_auth_only=yes
#  -o smtpd_reject_unlisted_recipient=no
#  -o smtpd_client_restrictions=$mua_client_restrictions
#  -o smtpd_helo_restrictions=$mua_helo_restrictions
#  -o smtpd_sender_restrictions=$mua_sender_restrictions
#  -o smtpd_recipient_restrictions=
  -o smtpd_relay_restrictions=permit_sasl_authenticated,reject
#  -o milter_macro_daemon_name=ORIGINATING
#smtps     inet  n       -       n       -       -       smtpd
#後略
/etc/sysconfig/saslauthd の設定
オリジナルファイルのバックアップ。
cd /etc/sysconfig
cp -p saslauthd saslauthd_org
設定内容は以下の通り。これでシャドウパスワードによるユーザ認証に変更する。
#既存設定からの変更
MECH=shadow
設定後コンフィグは以下の通り。
# Directory in which to place saslauthd's listening socket, pid file, and so
# on.  This directory must already exist.
SOCKETDIR=/run/saslauthd

# Mechanism to use when checking passwords.  Run "saslauthd -v" to get a list
# of which mechanism your installation was compiled with the ablity to use.
#MECH=pam
MECH=shadow

# Additional flags to pass to saslauthd on the command line.  See saslauthd(8)
# for the list of accepted flags.
FLAGS=
サービス起動
Postfix と SASL の起動及び自動起動設定、ファイアウォールの停止。
systemctl enable --now postfix
systemctl enable --now saslauthd
systemctl disable --now firewalld
Postfix のサブミッションポート (587) が開いていることを確認。
#確認コマンド
ss -natup | grep master

#出力
tcp   LISTEN 0      100           0.0.0.0:25        0.0.0.0:*     users:(("master",pid=16490,fd=13))
tcp   LISTEN 0      100           0.0.0.0:587       0.0.0.0:*     users:(("master",pid=16490,fd=17))
テスト用 OS ユーザ作成
ユーザ追加とパスワード設定。
useradd -s /sbin/nologin mailuser01
passwd mailuser01
Postfix 動作確認
Telnet を使ってテストするので未インストールの場合は telnet をインストール。
dnf install -y telnettelnet localhost 25を実行し、220 <メールサーバFQDN> ESMTPまで表示されることを確認。
[root@inmail ~]# telnet localhost 25
Trying ::1...
telnet: connect to address ::1: Connection refused
Trying 127.0.0.1...
Connected to localhost.
Escape character is '^]'.
220 inmail.kagenokouchikusya.xyz ESMTP続けてEHLO <ドメイン名>を入力し250 CHUNKINGまで表示されることを確認。
EHLO kagenokouchikusya.xyz
250-inmail.kagenokouchikusya.xyz
250-PIPELINING
250-SIZE 10240000
250-ETRN
250-STARTTLS
250-AUTH PLAIN LOGIN
250-AUTH=PLAIN LOGIN
250-ENHANCEDSTATUSCODES
250-8BITMIME
250-DSN
250-SMTPUTF8
250 CHUNKING続けてAUTH LOGINと入力。334 VXNlcm5hbWU6が表示されればOK。
AUTH LOGIN
334 VXNlcm5hbWU6
メール送信サーバ Dovecot の設定
必要パッケージインストール
dnf install -y dovecot/etc/dovecot/dovecot.conf の設定
オリジナルファイルのバックアップ。
cd /etc/dovecot
cp -p dovecot.conf dovecot.conf_org
設定内容は以下の通り。
#既存設定またはコメントアウトからの変更
protocols = imap pop3
listen = *| 設定項目 | 項目の説明 | 設定値 | 設定値の説明 |
|---|---|---|---|
| protocols | 対応プロトコルの設定。スペース区切りで複数指定可能 | imap | |
| pop3 | |||
| lmtp | |||
| submission | |||
| listen | IPv4、IPv6 対応の設定 | *, :: | IPv4、IPv6の両方 |
| * | IPv4のみ |
/etc/dovecot/conf.d/10-auth.conf の設定
オリジナルファイルのバックアップ。
cd /etc/dovecot/conf.d
cp -p 10-auth.conf 10-auth.conf_org
設定内容は以下の通り。
#既存設定またはコメントアウトからの変更
disable_plaintext_auth = no
auth_mechanisms = plain login| 設定項目 | 項目の説明 | 設定値 | 設定値の説明 |
|---|---|---|---|
| disable_plaintext_auth | 平文認証の無効化 | yes/no | 平文を許可する場合はno |
| auth_mechanisms | 認証メカニズムの設定 | plain | |
| login | 古いメーラで使われているらしい |
/etc/dovecot/conf.d/10-mail.conf の設定
オリジナルファイルのバックアップ。
cd /etc/dovecot/conf.d
cp -p 10-mail.conf 10-mail.conf_org
設定内容は以下の通り。メール格納方式の設定。
#既存設定またはコメントアウトからの変更
mail_location = maildir:~/Maildir
/etc/dovecot/conf.d/10-ssl.confの設定
オリジナルファイルのバックアップ。
cd /etc/dovecot/conf.d
cp -p 10-ssl.conf 10-ssl.conf_org
設定内容は以下の通り。SSLの無効化。
#既存設定またはコメントアウトからの変更
ssl = no
サービス起動
Dovecot の起動及び自動起動設定。
systemctl enable --now dovecotクライアントのメーラーの設定
Windows で Thunderbird を使用します。
Thunderbird でアカウント設定から新規アカウントの作成を行います。
以下の設定画面で各項目を設定し、「完了」をクリックします。
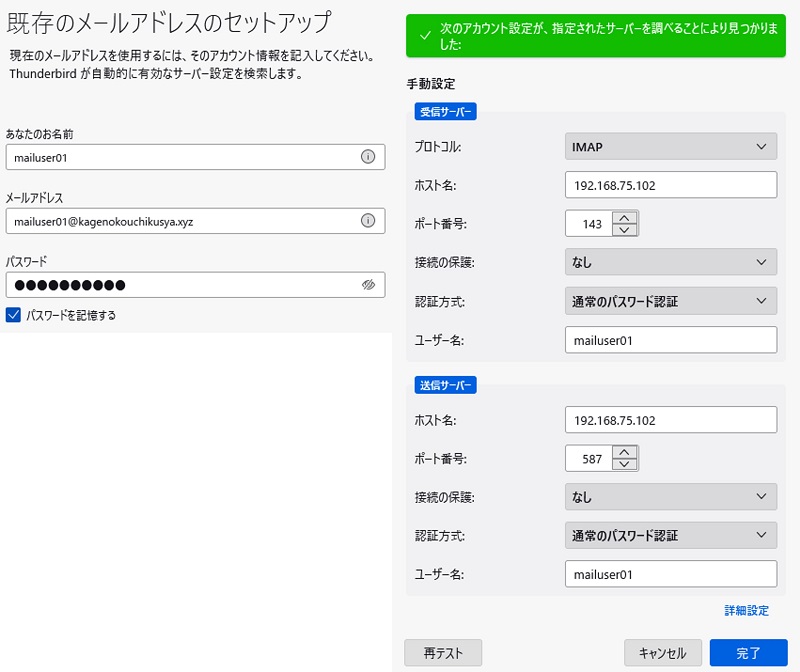
- メールアドレスは Postfix の設定の中で作成したテスト用ユーザを使用して「ユーザ名@ドメイン」とします
- パスワードはテスト用ユーザのパスワードを入力します
- サーバ情報は手動設定で設定します
- 受信サーバは Dovecot の設定に合わせて設定します
- 送信サーバは Postfix の設定に合わせて設定します
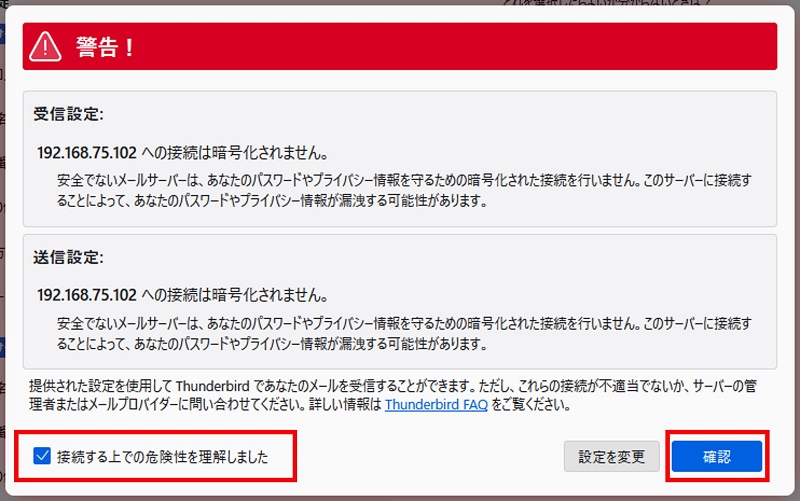
以下の警告画面が表示されるため、下側のチェックを入れ「確認」をクリックします。
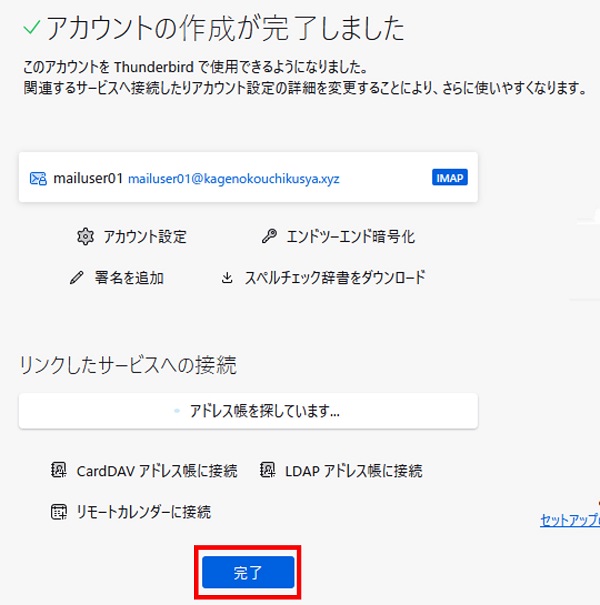
以下の画面が表示されればアカウント作成は成功です。「完了」をクリックして画面を閉じます。
メールの送信テスト
Thunderbird から実際にメールを送信してみます。このとき宛先を Gmail にすると Gmail 側のセキュリティによってメールが拒否される可能性が高いので、Gmail 以外にもいくつかのドメイン宛に試すのが良いです。
Postfix のメールログは /var/log/maillog に保存されるため、メール送信後このログを確認します。
以下はメール送信に成功したときのログです。
May  3 17:12:43 inmail postfix/smtpd[1802]: connect from unknown[192.168.75.1]
May  3 17:12:43 inmail postfix/smtpd[1802]: E6EF1202EA34: client=unknown[192.168.75.1], sasl_method=PLAIN, sasl_username=mailuser01
May  3 17:12:43 inmail postfix/cleanup[1805]: E6EF1202EA34: message-id=<c5802f17-2632-4b74-9a65-453b068c50a4@kagenokouchikusya.xyz>
May  3 17:12:43 inmail postfix/qmgr[1151]: E6EF1202EA34: from=<mailuser01@kagenokouchikusya.xyz>, size=687, nrcpt=1 (queue active)
May  3 17:12:44 inmail dovecot[913]: imap(mailuser01)<1786><uF1M+IcXBevAqEsB>: Disconnected: Logged out in=1382 out=4223 deleted=0 expunged=0 trashed=0 hdr_count=1 hdr_bytes=279 body_count=0 body_bytes=0
May  3 17:12:44 inmail dovecot[913]: imap-login: Login: user=<mailuser01>, method=PLAIN, rip=192.168.75.1, lip=192.168.75.102, mpid=1810, session=<aB3GSIgXFebAqEsB>
May  3 17:12:45 inmail postfix/smtp[1806]: E6EF1202EA34: to=<宛先メールアドレス>, relay=宛先ドメイン[宛先アドレス]:25, delay=1.2, delays=0.03/0.06/0.84/0.3, dsn=2.0.0, status=sent (250 2.0.0 Ok: queued as DFCE9A02FE008)
May  3 17:12:45 inmail postfix/qmgr[1151]: E6EF1202EA34: removed
May  3 17:12:48 inmail postfix/smtpd[1802]: disconnect from unknown[192.168.75.1] ehlo=1 auth=1 mail=1 rcpt=1 data=1 quit=1 commands=6
以下は Gmail 宛に送信し、Gmail 側のセキュリティによって拒否された場合のログです。
May  3 17:15:52 inmail postfix/smtpd[1811]: connect from unknown[192.168.75.1]
May  3 17:15:52 inmail postfix/smtpd[1811]: A20EE202EA34: client=unknown[192.168.75.1], sasl_method=PLAIN, sasl_username=mailuser01
May  3 17:15:52 inmail postfix/cleanup[1814]: A20EE202EA34: message-id=<1bd52dfa-7238-4fe7-94f0-344bf7b666a3@kagenokouchikusya.xyz>
May  3 17:15:52 inmail postfix/qmgr[1151]: A20EE202EA34: from=<mailuser01@kagenokouchikusya.xyz>, size=676, nrcpt=1 (queue active)
May  3 17:15:52 inmail dovecot[913]: imap(mailuser01)<1810><aB3GSIgXFebAqEsB>: Disconnected: Logged out in=865 out=2286 deleted=0 expunged=0 trashed=0 hdr_count=1 hdr_bytes=279 body_count=0 body_bytes=0
May  3 17:15:52 inmail dovecot[913]: imap-login: Login: user=<mailuser01>, method=PLAIN, rip=192.168.75.1, lip=192.168.75.102, mpid=1819, session=<720EVIgXYebAqEsB>
May  3 17:15:55 inmail postfix/smtp[1815]: A20EE202EA34: to=<宛先アドレス>, relay=gmail-smtp-in.l.google.com[173.194.174.26]:25, delay=3.2, delays=0.02/0.07/1.6/1.4, dsn=5.7.1, status=bounced (host gmail-smtp-in.l.google.com[173.194.174.26] said: 550-5.7.1 [106.155.1.133] The IP you're using to send mail is not authorized to 550-5.7.1 send email directly to our servers. Please use the SMTP relay at your 550-5.7.1 service provider instead. For more information, go to 550 5.7.1  https://support.google.com/mail/?p=NotAuthorizedError x12-20020a170902ec8c00b001eb2f260f89si2565374plg.484 - gsmtp (in reply to end of DATA command))
May  3 17:15:55 inmail postfix/cleanup[1814]: C83E920326D6: message-id=<20240503081555.C83E920326D6@inmail.kagenokouchikusya.xyz>
May  3 17:15:55 inmail postfix/qmgr[1151]: C83E920326D6: from=<>, size=3570, nrcpt=1 (queue active)
May  3 17:15:55 inmail postfix/bounce[1820]: A20EE202EA34: sender non-delivery notification: C83E920326D6
May  3 17:15:55 inmail postfix/qmgr[1151]: A20EE202EA34: removed
May  3 17:15:55 inmail postfix/local[1822]: C83E920326D6: to=<mailuser01@kagenokouchikusya.xyz>, relay=local, delay=0.01, delays=0/0.01/0/0, dsn=2.0.0, status=sent (delivered to maildir)
May  3 17:15:55 inmail postfix/qmgr[1151]: C83E920326D6: removed
May  3 17:15:57 inmail postfix/smtpd[1811]: disconnect from unknown[192.168.75.1] ehlo=1 auth=1 mail=1 rcpt=1 data=1 quit=1 commands=6
以下のエラーメッセージが Gmail から返されていますが、この場合、送信元グローバル IP がブラックリストに含まれているため拒否されているとの情報がありました。この場合は Gmail から拒否されないグローバル IP を持つインターネット回線に変更するくらいしか方法がなさそうです。
status=bounced (host gmail-smtp-in.l.google.com[173.194.174.26] said: 550-5.7.1 [送信元IP] The IP you’re using to send mail is not authorized to 550-5.7.1 send email directly to our servers. Please use the SMTP relay at your 550-5.7.1 service provider instead.
以上です。
Amazon アフィリエイトリンク
以下は Amazon アフィリエイトリンクです。インフラエンジニアにそこそこおすすめなアイテムです。


note メンバーシップへの参加もお待ちしています!

【アフィリエイト】おすすめ WordPress テーマ【SWELL】
当サイトでは WordPress テーマとして SWELL を使用しています。以前は無料・高機能テーマとして知られる Cocoon を使用していて Cocoon も使いやすかったのですが、SWELL を使い始めてからは SWELL のほうが圧倒的に使いやすいなと思いました。そして何より読み込み速度が速い。SWELL を使い始めてから、過去の Cocoon のブログを見直したときに「あれ、こんなに表示遅かったっけ?」という感覚になりました。
また SWELL はデフォルトでもオシャレなデザインですが柔軟にカスタマイズすることもでき個性のあるサイトを作成できます。さらにブログパーツや広告タグといった再利用可能なブログの「部品」も作成することができ、ブログ作成効率も高いです。
技術ブログやアフィリエイト等での収益化を見据えたブログの作成に SWELL は最適です。初見では価格が高いなと思うと思いますが、私としては SWELL を採用して良かったしそれ以上の価値があると感じています。
ブログの新設やテーマ変更を考えている人は一度 SWELL を検討してみてください。
以下の画像リンクから詳細な情報を確認できます。
レンタルサーバーを探している人には安定性に定評のあるエックスサーバーをお勧めします。
当サイトもエックスサーバーを使用しています。WordPress のインストールも簡単にできます。
コメント